Dual coding involves the use of diagrams to support an explanation. In my last post, I explained that there are two types of diagrams: organising visuals & representative visuals. I discussed how organising visuals are diagrams which make the hidden structure behind an idea visible to pupils. There are four types of organising visuals, the first of which I shared in my previous post: diagrams that depict processes or sequences. In this post, I share how I use organising visuals to make the hidden structure of definitions and of complex concepts visible to pupils.
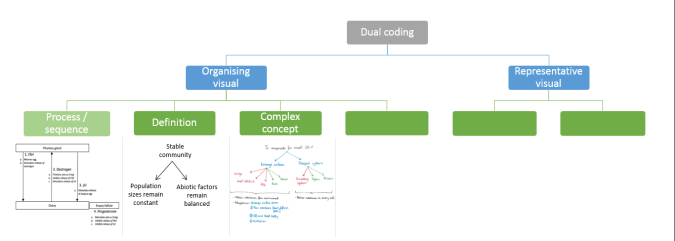
Organising visual 2: definitions
In the growing age of knowledge organisers, definitions seem like the least obvious thing to dual code. They ought to just be a string of words, right? Having seen pupils struggle to memorise a wordy definition on its own, or mindlessly copy the definition out to learn it without understanding it, I have found that revealing the structure of a definition can be helpful to make both the definition but also its meaning more memorable.
Take ‘bases’ and ‘alkalis’ as examples. Bases can be defined as: ‘Chemicals which neutralise acids. Bases are either insoluble or soluble. Soluble bases are known as alkalis.’ I can depict this using a simple diagram during my explanation:

Another example: stable community – ‘a group of species whose population sizes remain fairly constant in a habitat where environmental (abiotic) conditions remain balanced’. This is tricky to understand as a sentence, particularly for weaker pupils. But breaking the definition up into two parts – and showing this visually – makes it so much more digestible.

Sometimes, I add the words ‘living’ and ‘non-living’ on the arrows to make the two components more memorable.
How to use in the classroom
During an explanation, always starts with concrete examples (see part 1 of this blog series). Once you have introduced lots of examples, you are ready so share the summary definition. Draw the organising visual live. This will help you to chunk your explanation. You can then cover up one part of the diagram and ask pupils to tell you what is missing. You can ask questions like: ‘How many types of bases are there?’ or ‘How many things need to be in balance in a stable community?’ By asking these questions, you are making a framework explicit to your pupils: ‘You need to remember TWO things’.
In lessons long after the definitions were first taught, I have seen pupils draw two arrows straight away onto their mini whiteboards, and then think hard: they recall one component and KNOW there is a second, because the diagram memorably had two arrows. I see pupils persevering to remember the full definition. Without the diagram, they are far more likely to write one part and think they are finished. That is the power of dual coding: it gives pupils a structure to hang their knowledge on, in addition to the knowledge.
Eventually, pupils master the definition and can explain it straight away without retrieving the diagram. That is the aim: to eventually remove the crutch. This can be achieved by regular retrieval in lessons, or by putting the diagram on a knowledge organiser to help pupils revise it at home. It is important to remember that you do not need diagrams for everything. For example: ‘Bases neutralise acids and have a pH >7’ is a fact that pupils need to learn. This phrase does not need a diagram. The key to a good knowledge organiser is striking a balance between the parts of a definition you can dual code, and which definitions pupils can can learn without diagrams. Not everything needs to be dual coded.
Finally, this type of organising visual does not work for all definitions. Do not use dual coding to define natural selection – a broad concept – for example. It only works if a definition is an umbrella term, or has clear constituent parts. If you find yourself writing an abstract definition that would need several examples to actually understand, question whether it is suited to a knowledge organiser.
Organising visual 3: complex concept
Sometimes, a complex concept is beautifully structured in your head. But because you are an expert, you might be blind to the organisational framework you use to arrange the constituent parts. Get a pen and start to write down the component ideas of the complex concept, and arrows to link the ideas. You might end up with a mind map, or a complex web of arrows, or something else altogether.
Consider this biology example of a concept that is so complicated, that it seems impossible to summarise into a diagram. Multi-cellular organisms have evolved exchange surfaces, such as the lungs, to obtain substances essential for their survival from their environment. They have also evolved transport systems, such as the circulatory system, to ensure every cell in the body beyond the exchange surface receives these substances. Exchange surfaces and transport systems compensate for multi-cellular organisms having a small surface area to volume ratio. This is not a definition or a process, but a concept.
Now look at the following diagram – not only does it summarise the above information, but it contains even more information! How is this possible?
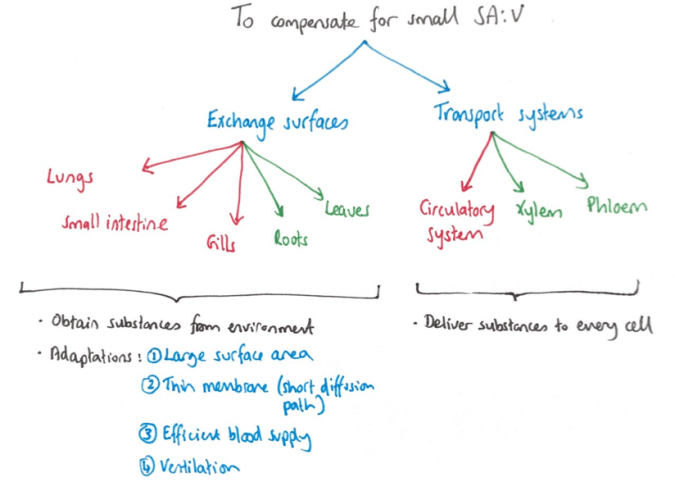
Arrows are the magical tool here. Arrows can mean anything. The blue arrows in this diagram mean ‘multi-cellular organisms have evolved…’ whereas the red arrows mean ‘such as the following in animals…’ and the green arrows mean ‘such as the following in plants…’.
The beauty of such summary diagrams is that they enable pupils to appreciate the whole idea, whilst simultaneously zooming in on and paying attention to understanding one small part.
How to use in the classroom
I use diagrams summarising complex concepts at the end of a unit, when I am making links between different topics covered. First, I break up the diagram into chunks and use them to explain one idea at a time, as with the ‘definitions’ dual coding above. Once each constituent idea has been mastered, I build up to showing the whole diagram, and talk about one idea at a time in reference to the other idea. This helps me to make the links between two individual ideas explicit during my explanation.
By having a visual up on the board, as I am talking about one part, my pupils can still keep an eye on the other parts of the visual. This means pupils do not have to hold too many pieces of information in their working memory at any given time. They can focus their attention on one piece of information, whilst also being able to see peripherally where this piece of information fits in with the rest of the schema.
The biggest flaw in the teaching of complex ideas I see, is that teachers become satisfied with pupils mastering the component parts of a complex idea after a series of lessons and leaving it there. In contrast, the best teachers then bring everything together to help pupils appreciate the bigger picture: how does everything we have learned so far come together? In many ways, this is where the beauty of our subjects and of our curricular thinking can be shown off: look at the journey we have come on, see how all of these ideas we have mastered fit together in an elegant big picture that explains even more than the individual parts! Delightful!
For practice, get pupils to label the arrows. Get pupils to write sentences and paragraphs using this framework. Get pupils to practice drawing the concept maps to fluency.
Next time, I discuss the final type of organising visual: procedures.

Pingback: Clear Teacher Explanations I: examples & non-examples | Bunsen Blue
Pingback: Clear Teacher Explanations 2a: dual coding – processes | Bunsen Blue
These are fantastic explanations. Very much looking forward to the next editions.
LikeLike
Pingback: Clear Teacher Explanations 2c: Procedures | Bunsen Blue
Pingback: Clear Teacher Explanations 2d: Faithful Diagrams | Bunsen Blue
Pingback: Dual Coding in a Nutshell – Mr T's Blog: Keeping it simple!