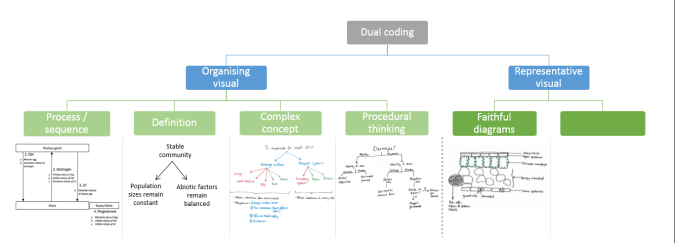
Diagrams can help an explanation in two ways. Firstly, to organise a complex web of information such as:
Secondly, to depict things: either faithfully from real life or as models. I call this type of dual coding ‘representative visuals’.
Diagrams are powerful ways of depicting objects from real life in a simplified form. The main advantage of drawing your own diagrams is that you can choose the most salient features you want pupils to remember and discard details that are not important. For example, I use the following diagram to teach my pupils the layers of cells that make up a leaf.
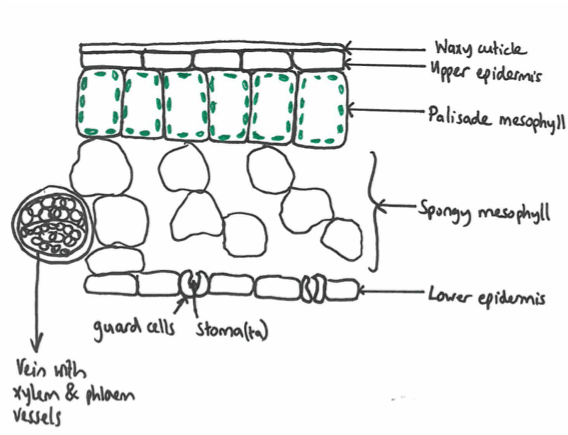
By drawing this myself, not only do I get to choose the features my pupils focus on, but I also get to teach my pupils how to draw this diagram. Every single one of our Y11s can draw the cross section of a leaf and label the tissues that make up the leaf exactly as above. The same is true for the villi of the small intestine and countless other faithful representations of the real world.

I show, pupils copy. 15 seconds at a time. See below.
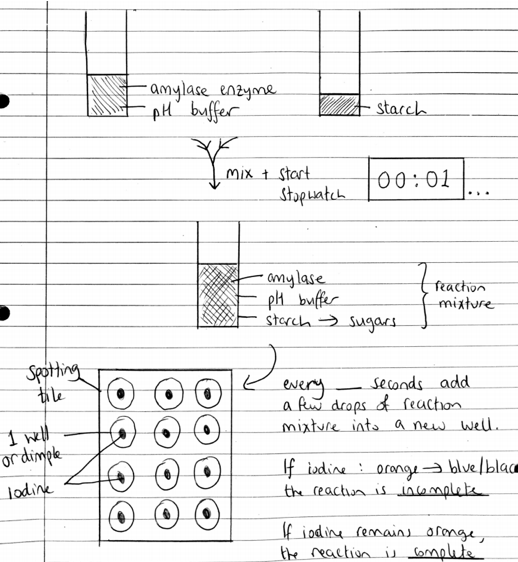
Finally, faithful diagrams are excellent for drawing out the steps of a practical procedure, like the one below.
How to use in the classroom
- Explicitly model how to draw the diagram on a mini whiteboard under the visualiser step-by-step. I really mean step-by-step: show what you want under the visualiser and give pupils 15 seconds to copy onto their boards. Add the next part of the diagram and ask pupils to copy.
- By the end, pupils know EXACTLY how we expect them to lay out the diagram. This means, in a future lesson, when I ask them to ‘draw the villi and label the adaptations’, I see a sea of identical whiteboards. By standardising the format in this way, I can scan boards really quickly to see who is struggling.
- Pupils then practise from memory at home. By learning a diagram, they have a structure onto which they can hook lots of facts. They also pick up on knowledge that I don’t have to make explicit with endless words. E.g. the relative shapes and sizes of the cells.
- I also set questions around the diagram to make the knowledge flexible and get pupils to apply their knowledge.


This panel shows how I taught my Y11s (oh, I miss them!) the three main adaptations of the villi of the small intestine. I add one feature onto my mini-whiteboard (under the visualiser) at a time. My pupils copy.
In future lessons, they retrieve the entire diagram from memory. The visual is a skeleton for them to remember that there are three adaptations to remember. My pupils know when they have forgotten one of them, because they can visualise the three villi. Once they have labelled two adaptations, they persevere to remember the third.
In this way, I have given my pupils a filing cabinet – a structure – in which pupils can organise their pieces of knowledge. Retrieval is no longer finding a needle in a haystack: it is about opening the right drawer to find exactly what is needed.
Next time, we look at diagrams for models.

so wonderfully clear, thank you!
LikeLiked by 1 person
Pingback: Clear Teacher Explanations I: examples & non-examples | Bunsen Blue
Pingback: How do the parts fit into the whole?- a strategy to check for understanding – Dr C's Science Classroom
Pingback: Beware, the superficial! – Memory, meaning and motivation